wood glue
one large pencil sharpener
sand paper in coarse, medium,, fine, and very fine.
fine steel wool or final stripping pads
tung oil
dobbers
C. Sanding the wheel
This first step in the construction of a drop spindle is the sanding of
the wheel. First use the coarse sand paper and sand off the factory finish
off. You should have a plain looking wheel. In fact it should be a little
lighter in color the before you sanded it. Next move on to the medium sand
paper, this will start to smooth out the wheel. The medium sand paper will
take the coarse marks off the wheel that the coarse sand paper left. When
you can not get the wheel any smoother with the medium sand paper move
on to the fine sand paper. Do the same thing that you did with the medium
sand paper. The Fine sand paper will smooth out the wheel a lot more and
the wheel will at this point start to feel a lot smoother. Once you have
finished with the fine sand paper you start with the very fine sand paper.
The very fine sand paper smooths the wheel out but also buffs the wheel.
The wheel will feel very smooth. DO NOT SAND THE DOWEL ROD.... this will
come later.
D. Decorating the wheel (optional)
After you have sanded the wheel and it is nice and smooth, you can choose
to decorate it. The most common way is to paint something such as your
arms, badge, or a nice picture on the spindle. I don't suggest carving
on the spindle because carving can effect the balance of the wheel. The
same goes for an uneven painting on the wheel. If you look at the wheel,
you will see that it has two different sides, a smooth one and a ridged
one. I like to call the ridged side , the fancy side. The fancy side of
the wheel is just that fancy, and more than likely looks good by it's self.
I suggest painting on the smooth side of the wheel. If your choose to decorate
your wheel, it should set up a minimum of overnight before you continue
working on your spindle.
E. Affixing the wheel to the dowel rod
First your take your dowel rod and cut it down to 12 to 13 inches. I like
13 inches for the fact that it gives me "opps" room, but if your cut the
rod at 12 inches you can make three drop spindles out of one dowel rod.
Play with the different sizes and see what works best for you. Once you
have cut your dowel rod, take the wheel and the rod, put the rod into the
hole of the wheel making sure the flat side of the wheel is facing up.
With the flat part of your hand tap the wheel on to the rod. If your dowel
rod does no pass through the wheel, take your leather worker hammer and
gently tap the wheel until it is about 2 inched pass the fancy side of
the wheel. If the dowel rod passes though the wheel easily, then it is
time to get out the wood glue. Take the wheel off the rod and put a few
drops of wood glue in the hole of the wheel. Move the wheel until two inches
of the dowel rod has passed through the fancy side of the wheel. Be careful
of how much wood glue you use, if you get too much on it the wheel will
look uneven when you put the tung oil on. If your used glue it is best
to wait until the next day to continue on to the next step.
F. Bottom point and sanding the dowel rod
At this point your work should look somewhat like a drop spindle. Now take
a pencil sharpener and turn the spindle over until you looking at the fancy
side of the wheel with the 2 inches sticking out. Place the sharpener over
the rod and sharpen to a point. After you have done this spin the spindle
like a top, it should spin nice and even just like a top. After you have
tested your spindle your need to sand the dowel rod just like you did the
wheel. First using the coarse sandpaper then moving on to the medium, fine
and very fine sandpaper. Make sure you round the top of your spindle so
that it does not cut the wool as you spin.
G. Grooving the top
From the top of your spindle measure down two centimeters and mark your
rod. Take your file and place it on the mark. Slowly turn the wheel so
that the file cuts a groove into the rod. Try to keep it even, this is
easier said that done. If your groove is a little uneven, this should have
little effect on your work. Your groove should be about 1/4 inch wide and
about 1/8 inch deep. If your go too deep you weaken your rod but if your
don't go deep enough the spun work will not hold in the groove.
H. Tung oil
Now your are ready to tung oil your drop spindle. First make sure you are
in a well vented room, this stuff smells bad and can make you sick. Open
the tung oil and dip your dobber in it. Put a light coat of the tung oil
the drop spindle. Let it dry for two hours then take your steel wool and
lightly buff. Put on the next coat and let stand overnight, then lightly
buff it the next day. The amount of time need to sit may very depending
on the humidity of your area. You may repeat these steps as many times
as you like, the more tung oil you use the better your drop spindle will
look. Be careful you don't fill in the groove at the top of the spindle.
I. Summery
By following these simple steps you should be able to build a drop spindle
as good as any store bought one out there. You can use any size wheel and
dowel rod that fits the wheel. I suggest that you do not go smaller than
two inches or larger than three inches. What ever you decide, you should
enjoy your new drop spindle.
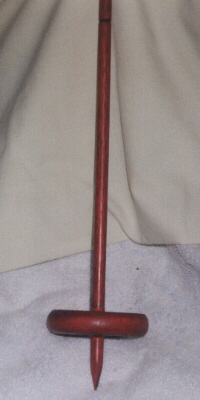
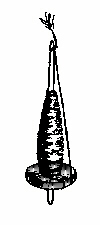
This is one of my homemade drop spindles
Mail me with comments Lemoine Beers
over to my Main page
over to my Dye
page
over to my Niddy
Noddy Page
over to my lost
page
over to my My Weblog
If you would like to download a copy of this page click here
This files is called spindle.zip and has show how to make a Drop Spindle and a Niddy Noddy.
This is a Lemoine D. Beers II Web page protected under United States Copyright
laws. Feel free to to copy and or pring this page as long as this Copyright
statement is printed along with it. copyright 1991-2001.